The question of “how to properly transport a kayak” is an important and multi-layered one, a question that should be in your mind before purchasing your kayak or even your vehicle.
Although most kayaks can travel atop almost any type of vehicle, the truth is that some kayak racks are more advantageous when used with certain types of vehicles, and there are even a few rare occasions when a rack of any type is just not suited for a particular vehicle.
Nevertheless, it’s important to research the subject of transportation before purchasing any kayak.
Today, we will talk about kayak transportation, including how to transport a kayak using a variety of different vehicle types, the purchasing and installation of kayak roof rack systems, and the right way to load and secure your kayak for the safest travel possible.
Transporting Your Kayak in a Pickup Truck
If you have an open-bed pickup truck (without a camper shell), you possess the best vehicle for transporting a kayak. However, just simply throwing the kayak into the back of your truck is not enough to ensure the safety of you, your kayak and other people on the road.
You may have seen kayaks being transported in a pickup truck in which the tailgate is closed and the butt end of the kayak is extended upwards. This is not safe, as the wind can catch underneath the kayak, slowing you down and increasing the chance that your kayak will fly out of the bed, potentially hurting other drivers.
When using a pickup truck to transport your kayak, the first thing you will want to do is lower your tailgate, and carefully slide your kayak into the bed of the truck until the nose of the kayak reaches the cab.
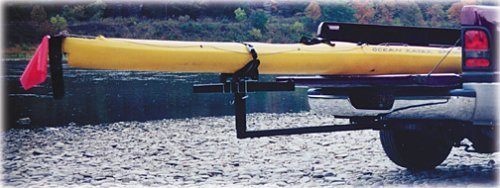
Then, use industrial strength tie-downs to secure the kayak in place. Depending on the size of your kayak and truck bed, part of the kayak may extend past the tail gate. This is okay. However, remember to secure a red flag onto the portion of the kayak extending from the truck. This is required by law.
If you have a hitch attachment on your truck, and you prefer to not have the kayak extend past your tailgate, there are several products on the market today that will allow you to essentially lengthen the size of your truck bed.
With names like “Extend a Truck,” these attachments fit onto the hitch ball and act as an extra form of support out of the back of the truck. These products make it easy to load and unload the kayak, and it’s one of the safest ways to secure a kayak to a vehicle. It is also very economical in comparison to roof rack transport systems.
Check out our top recommendations for kayak truck racks!
If you purchase one of the Extend-a Truck products to transport your kayak, there is also another advantage: Most of these products have the option to swap ends, so that instead of extending outward, it extends vertically, behind the tailgate.
If you add a single crossbar over the cab of the truck you can then transport the kayak above the truck, leaving the bed open for storage. This is a great option for longer trips and weekend getaways when you need the bed space for extra storage.
Transporting Your Kayak Using a Roof Rack
There are many types of roof racks you can use to transport your kayak. Below we will take a look at the various options for transporting your kayak atop an SUV and a four-door car, and take a closer look at the roof racks available for aftermarket purchase.
Roof Racks for SUVs
Most Sport Utility Vehicles (SUVs) on the market today come with some sort of luggage rack on the roof or, at a minimum, the side rails on the roof as part of the standard package.
If your SUV already has the full luggage rack on the roof, complete with the side rails and the cross bars, this is usually sufficient to transport a kayak. However, if you only have the side rails, you will need to purchase either a crossbar package or an aftermarket roof rack (see section on aftermarket kayak racks in the section below).
If your particular SUV has the full luggage rack, there are a couple of things you will need to do before trusting it to transport your kayak. They include:
- Inspect the rack. Wear and tear can occur anywhere on your vehicle, and roof racks are no exception. Therefore, before entrusting your SUV roof rack to support a 70+ pound kayak, be sure to inspect the rack thoroughly, looking for wear in the brackets in and connections.
- Research the load rating. While almost all roof racks today are rated for much higher loads than the typical weight of a kayak, if you have an older model SUV, check with the dealer or consult your owner’s manual just to be on the safe side.
Also Read: Best 2 Kayak Roof Racks
Roof Racks for Cars
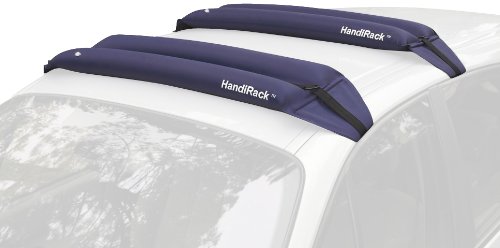
If you plan to transport your kayak on the top of a (4-door) car, your best bet is to utilize a removable soft rack system. A soft rack system is basically a set of foam, rubber, or inflatable tubes with two high-capacity straps running through the center of each tube.
These are fairly easy to attach by following the steps below:
- Open all four doors of the vehicle
- Set one tube on the roof facing the windshield, and the other facing the rear window
- Set the kayak upside down on the foam rubber tubes
- Use the remaining straps to secure the kayak to each tube
- Secure the bow and stern of the kayak to the front and back bumper, respectively this will eliminate any flex.
This simple system is the preferred method for car owners who plan to use their kayaks locally, mostly because it is non-permanent and much more affordable than an expensive aftermarket rack system. However, if you plan to take longer trips with your kayak, a more permanent and safe rack system is recommended.
The soft rack system has a few drawbacks. Most notably, it does not offer a lot of clearance between the kayak and the roof, making it more likely for one or the other to become damaged. Also, vehicles with rounded roofs can sometimes pose a problem, as the shape of the roof makes it more difficult to adequately space the tubes.
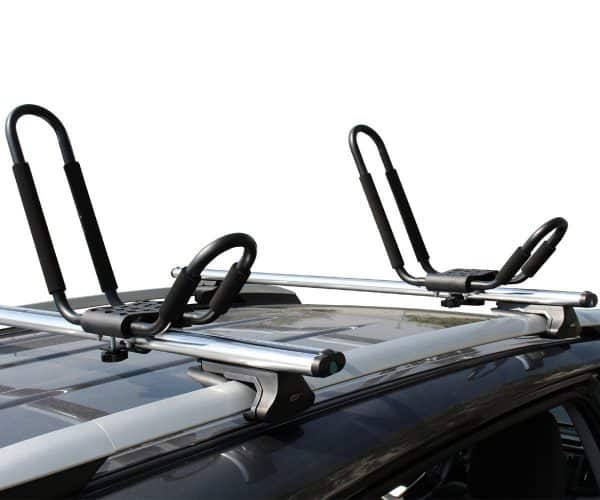
Purchasing
There are essentially two different types of aftermarket roof racks. Although very similar in the way they work, one of these rack systems has rounded bars, and the other has square bars.
These racks fit a wide range of vehicles and offer many different add-ons for the cross bars that enable them to not only properly and safely secure a kayak, but also everything from luggage to bicycles to snowboards. Both types of roof rack systems are similar in price and very adaptable.
One advantage of the square-bar system is that it prevents the add-ons from potentially spinning on the bars, which can be a problem in those systems with rounded bars.
When deciding which roof rack system is right for you, the first things you will need to do is determine the length of the system you will need. This will depend almost entirely on the type of vehicle you have. Roof rack systems are made with particular makes and models in mind, so consult your user’s manual or look online to see what size roof rack you will need.
As we mentioned before, some SUVs come complete with roof rack side rails and no crossbars. In this case, you have two options:
1. You can purchase a crossbar package from the dealership,
or 2. Simply purchase a brand new roof rack system. In this case, we recommend option number 2.
Crossbar packages from the dealership are often just as expensive as complete aftermarket roof rack systems. Also, if you buy an aftermarket product, you will receive the added benefit of the compatible add-ons, not to mention the sturdier metal bars compared to the plastic side rails usually included with most factory roof racks.
If you have an older van or SUV with a rain gutter, an external lip running the length of the roofline, there is a type of mount that will clamp directly onto that lip called the Gutter Foot Pack, a versatile mount that gives even these difficult mounting situations an added measure of safety and security.
Whichever roof rack system you decide to purchase, with rounded bars or square bars, the most important tips to consider are:
- Check your user’s manual or consult your dealer regarding the correct type and size of roof rack for you. Be sure to mention any potential mounting problems, such as existing side rails (some SUVs) or a rain gutter.
- Follow all instructions as written and be sure all the mounts are tightened to specification.
- Check your roof rack before every trip to ensure the mounts are still secure and have not been tampered with.
- Follow all directions when loading your kayak onto the roof rack (see next section).
- Follow all posted speed limits.
- Enjoy your kayak!
Attaching a Roof Rack
When attaching your roof rack system, be certain that you follow all of the included directions exactly as written, making sure all the mounts are tight and secure.
More often than not, accidents involving roof rack systems are the result of improper installation rather than a failure to tie your kayak down properly, and these instances of improper installation can cause you to lose the entire roof rack. Also, check your mounts before every trip you take, just to ensure that nobody has tried to tamper with it.
The second piece to carefully consider is the mount itself, or what many manufacturers call the “foot pack.” There are many different types of foot packs designed specifically for different mounting options, mounting on SUVs, on vehicles with a rain gutter, camper shells, etc.
Even the same vehicle may have numerous mounting options, so decide which method is best for your vehicle before purchasing the foot pack.
How to Transport a Kayak: Loading, Securing and Transporting Your Kayak
Now that you have purchased, installed and inspected your new roof rack system, the next step is to load your kayak onto the roof rack and secure it safely for travel. Of course, there are many ways this can be accomplished, but by following the steps below you can always rest easy knowing you have “checked all the correct boxes” for safe transportation.
Loading Your Kayak
Although it is absolutely possible to load your kayak onto your rack system by yourself, it never hurts to have an extra pair of hands and a little more muscle power. To help ensure that you load your kayak correctly, below we have outlined both the 2-person and solo-loading method.
2-Person Kayak Loading Technique
The following are the best steps to follow when loading your kayak with a friend:
- Layout the Straps. Where applicable, always lay out the straps atop your vehicle beforehand. These are what you will use to ultimately tie the kayak down.
- Ready the Kayak. Lay out the kayak next to your vehicle with the face down.
- Lift the Kayak. With one person holding the bow of the kayak and the other holding the stern, perform an overhead lift.
- Place the Kayak. Once you have hoisted the kayak over head, walk it into place until it’s directly over the rack in the proper position, and then gently place it down on the rack.
- Unloading. Reverse this process exactly when unloading the kayak.
Solo-Loading Technique
As you can see, loading your kayak with the help of a friend is very simple and straightforward. The solo-loading technique, however, which is outlined below, is a little more difficult and involved.
- Ready the Kayak. With the kayak right-side-up, position the kayak at the back of your vehicle so that one end of the kayak is on the ground and the other is resting on the rear cross bar.
- Push the Kayak Up. Grabbing the portion of the kayak that is on the ground, carefully lift the boat and push it up onto the rack until it is properly centered on the same.
- Turn the Kayak. If you opt to travel with the kayak upside down, this is the point where you will turn the kayak.
- Slide the Straps Underneath. Slide the tie-down straps underneath the kayak in preparation for the securing step.
There are a few aftermarket products on the market today that can assist with solo loading. For instance, some racks come with collapsible wheels on them, making it easy to slide the kayak into place.
Another product, called an integrated lift system, is designed to help with the lifting process. Check with the manufacturer of your particular roof rack to see if one of these add-ons may benefit you.
Securing Your Kayak
There are essentially two options for securing your kayak to your roof rack system: tie-down straps and rope. Below we will look at both of these securing mediums, and provide a step-by-step guide for securing your kayak properly.
Tie-Down Straps
By far, the best accessories for securing your kayak are tie-down straps. Most aftermarket roof rack systems come complete with the straps you will need to accomplish this task. These straps feature secure, self-locking cam buckles that are very easy to tighten and to use, providing superior grip.
Moreover, these straps typically include some sort of padding where the buckle comes into contact with the kayak, thus preventing damage or scratches to your kayak. Once you have tightened the strap using the buckle, be sure to tie off the ends or extra parts of each strap into a knot for added security.
Ropes
As mentioned above, tie-down straps with a built-in cam buckle are far superior to ropes as a securing medium, but rope can be used in a pinch, assuming you are very confident in your knot-tying ability.
If you have to use rope, make sure it meets the following requirements:
- Seasoned – new ropes tend to stretch and loosen during travel
- Non-slick – slippery ropes can become untied during travel
- Non-elastic – a firm, non-elastic rope will ensure the rope doesn’t expand.
Steps for Securing Your Kayak
Whether using ropes (not bungee cords) or the preferred tie-down straps to secure your kayak, try to follow these basic steps to ensure the most secure and safe connection:
- Be certain that your kayak is perfectly centered as directed on the roof rack system of your choosing.
- Run (at least) two lines of straps width-wise across the roof of the car, and attach the kayak to the rack using these straps.
- Securely attach the ends of the kayak (bow and stern) to the front and rear bumper of your vehicle, respectively. Most roof rack systems come with tie-down straps that are designed specifically for this attachment.
- If your kayak will not be under your watch at all times, be sure to lock into place using a boating cable to protect it from being stolen.
- If you so desire, you can purchase a cockpit cover to go over your kayak when transporting it. Cockpit covers are aerodynamically designed to reduce the drag caused by an uncovered kayak (or luggage, bicycle, etc.).
Although you want your kayak to be properly secured to your roof rack system, be sure not to over tighten the straps. Straps that are over-tightened where they come into contact with your kayak can, over time, cause damage to the fiberglass material or deform the hull of the boat.
Transporting Your Kayak
Now that your kayak is loaded up onto the roof rack and securely tightened using ropes or tie-down straps, you’re almost ready to hit the road. However, before you do, be sure and read through the following pre-drive checklist and some of the tips to observe when driving.
Pre-Drive Tips When Transporting a Kayak
When transporting your kayak, there are several things you should do before you set out for your water adventure. Here are just a few tips to keep in mind:
- Check to Ensure the Kayak Is Correctly Fastened. To ensure your kayak is firmly attached to your roof rack system, grab hold of either end of the boat and give it a good shake. If it has too much side-to-side to play, you may need to re-tighten the straps.
- Check Your Bumper Connections. Check the lines you attached to the front and back bumper of the boat to ensure they are secure.
- Consistently Recheck All Connections. Uneven road conditions can cause the tie down straps to loosen from time to time. Thus, check all connections each time you stop to ensure both your safety and the safety of the kayak.
- Check Your Tires. Make sure your tires are properly inflated.
- Check All Fluids. Just as you would when taking any other type of trip, check your vehicle’s oil and other fluids to ensure they are properly filled.
Driving With Your Kayak
The number one tip for driving with your kayak is to always proceed cautiously. High winds and poor road conditions can affect the performance of your vehicle, and the winds can cause drag that may interfere with your vehicle’s handling. Remember to observe all posted speed limits and never be in too big of a hurry.
Finally, make sure that your kayak is perfectly centered on the roof of your vehicle. Improperly centered kayaks can obstruct your view as a driver. Always be mindful of other vehicles on the road and adjust for spacing if your kayak extends past either the front or rear of your vehicle.
Final Thoughts
Whether you vehicle comes equipped with a roof rack system or you opt to purchase either a metal or soft-rack aftermarket product, be sure to check with your dealer regarding the correct rack for your type of vehicle. Follow all the instructions to a T when attaching your roof rack, paying special attention to the security of the mounts.
If you have a pickup truck, consider purchasing one of the many available products that can extend your truck bed, rather than having part of your kayak hanging over your tailgate.
Try to enlist the help of a friend when loading your kayak, or follow the solo-loading directions provided above. Remember there are many aftermarket, add-on products available for purchase that can help you both lift and center your kayak onto the roof rack.
Secure your kayak using tie-down straps across the width of your roof, and use special tie-down straps to secure the bow and stern of the boat to each bumper. Always check and re-check the tautness of your tie downs, and drive carefully while being mindful of other drivers.
By following these steps you can always be sure that you and your kayak will arrive safely at your destination.
Let the fun begin!
![]()