Before you start planning longer paddle trips, you need to learn how to self-rescue in a sea kayak. This is a technique that can require quite a bit of on-water practice in order to master so that you can return to it when needed.
We know that there can be great joy and reflection that comes with paddling alone too. But if sea kayaking is your primary method for getting away from it all, you won’t have anyone there to help you get back into your boat if you capsize.
There’s an old saying in the kayak guiding world (and other parts too!) that says, “It’s better to have it and not need it than to need it and not have it.” In this case, the knowledge of how to self-rescue is definitely something you’ll want in your kayaking tool kit.
So, we’ll cover the entire process of how to self-rescue in a sea kayak, including steps to prepare onshore, what to do immediately after you find yourself in the water, and where to go from there.
Jargon Buster
But before we get into the steps of a proper kayak self-rescue, there’s some basic kayaking terminology we need to cover. These terms will help you better understand the nuances of the techniques we’ll describe through the rest of this article.
Deck Lines
These are pieces of rope or bungee cord that run along the deck of your kayak. They can sometimes be used to store additional gear but are also useful to grab hold of to keep your kayak close once you’ve capsized.
Power Face
The power face is the front side of the blades on a kayak paddle. Most advanced paddles have a curved power face with an asymmetrical design to improve the efficiency of your paddle strokes.
Paddle Float
This is a piece of kayak rescue gear that attaches to one blade of your paddle to create an outrigger for added stabilization as you’re trying to re-enter your kayak.
Combing
This is a term that’s used to refer to the edge of your kayak’s cockpit. This edge is that the spray skirt will tighten around when you’re using it.
Cockpit
A kayak’s cockpit is where you sit in order to navigate your kayak. Most sea kayaks have cockpits compatible with spray skirts, which can keep you warmer on wet or cold days but can also complicate the self-rescue process.
Bulkheads
Bulkheads on a kayak are dividers that create separate compartments in the interior of the kayak. Some of these compartments are used for gear storage while others provide additional buoyancy for the kayak.
Bracing
Bracing is a technique that’s used to regain control of your kayak if you feel yourself beginning to capsize. It’s a preventative measure, however, and won’t be of much use to the kayaker who has already gone for an unexpected swim.
Edging
Edging is the practice of leaning one direction or the other to get a feel for the balance of your kayak. Practicing edging is a great step towards executing more advanced kayak maneuvers, but it’s also a prerequisite for bracing.
Onshore Prep
Experienced kayakers always do a little onshore prep before they hit the water. A great place to start is to load your kayak properly so that it’s balanced and less likely to capsize.
Properly packing your kayak requires balancing the weight from front-to-back and side-to-side.
In general, you should pack the heaviest items closest to the center of the kayak and the lighter items further towards the bow and stern of the kayak, respectively.
Most sea kayaks have bulkhead compartments that you’ll use to store your gear. If you have anything heavy, make sure you place it in the bulkhead just behind the cockpit of your kayak in order to keep your kayak as level as possible.
There can be a little bit of nuance that goes into properly packing a sea kayak for a longer trip. So we recommend reading up on the best ways to pack a kayak for camping or other long paddle adventures.
But once your kayak is packed, it’s also recommended to do a thorough check of your rescue gear and equipment before setting out.
Some examples of rescue equipment you might bring along include a paddle float, tow rope, bilge pump, and a repair kit.
But the most important piece of equipment for self-rescuing is arguably the paddle float.
So you should always make sure to practice attaching your paddle float to the blade of your paddle on-land so you feel comfortable doing so quickly in a rescue situation.
You should also be sure to inflate the float fully to check that it doesn’t have any leaks. Once you’ve performed these basic checks, store your float so that it will remain secure if you capsize but still be easy to access.
Under the deck lines toward the front of your kayak or in the cockpit behind your seat are two good options. Just make sure you’ll be able to get to it within a matter of moments when the need arises.
How To Prevent Capsizing
While it must be acknowledged that self-rescue is an important skill to master before paddling alone, there are several steps you can take to prevent capsizing before it occurs.
These are mainly paddle techniques or brace strokes that allow you to regain your kayak’s center of balance.
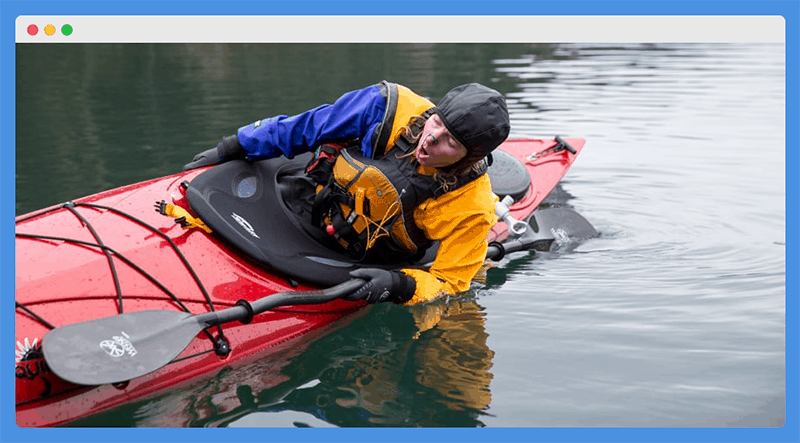
Bracing techniques are a great way to regain control of your kayak if you feel yourself about to capsize. There are two basic bracing techniques that you can familiarize yourself with: the low brace and the high brace.
The high and low brace techniques are named (conveniently) for the starting position of the paddle shaft. But they both involve pushing a flat blade of your paddle down into the water on the side of the kayak that you feel yourself tipping towards.
Bracing Example
But before you can practice bracing, you’ll need to get comfortable edging in your kayak.
This is the practice of tilting your kayak slightly to one side in order to find a balance point that both gives you more control of your kayak and allows you to execute quicker turns.
Edging is a prerequisite for bracing and should be practiced with your kayak at a standstill. Your lower body should be doing most of the work in controlling your kayak, and it’s important to engage your core muscles throughout the process.
Raise one knee slowly until it makes contact with your kayak. This will raise the kayak on the same side as the knee that you’ve raised and cause the entire kayak to tilt in the opposite direction.
The key to retaining control while edging is to keep your upper body straight while allowing only the kayak to tilt underneath you. Throughout the process, you’ll want to keep your upper body as close to the kayak’s centerline as possible.
And once you’ve got a hold on edging, you can add in the high or low brace as a finishing touch. Both of these brace techniques are the final step to recovery and they happen as you’re also working with your knees to bring your kayak level again.
Both the high and low brace techniques involve pushing down in the water with your paddle blade and simultaneously raising the knee on the bracing side.
The major differences between the two techniques involve hand placement and where you align your paddle as you’re beginning the technique.
Obviously, there are a few more nuances to executing these bracing and edging techniques properly, which is why you should check out this full article on how to edge and do a brace stroke in your kayak.
Edging Example
You can also use a sculling technique for support if your kayak is at rest. This technique involves using the power face of the paddle blade shallowly across the surface of the water.
By moving the face of the blade back and forth in the water, you can provide additional support for your kayak if it is not in motion. Note that this technique won’t work if you’re moving.
Still, this is a useful technique for keeping your kayak balanced while at rest and it’s especially useful in windy conditions or large waves.
To learn more about the sculling technique in general, check out this article.
First Steps Once You’re In The Water
The all-important first step when you know you’re going in the water is to remain calm and take several deep breaths. Okay, well, you don’t want to take deep breaths if you’ve capsized and haven’t exited your kayak yet, so save those for once you’ve come up for air.
But seriously, the first technique that you need to execute when you capsize in a sea kayak is a wet exit and it’s good to have a full breath of air for this one.
The technique will change slightly depending on whether you’re paddling with a spray skirt or not, so we’ll cover both processes here in the interest of thoroughness.
If you don’t have a skirt to worry about, wait for your kayak to stabilize once you’ve capsized. Then, lean forward, straighten your legs, and push yourself down and out of your kayak.
If you’re wearing a quality kayaking PFD (like you should always be!), you should float quickly to the surface. Make sure you grab the tow lines or handle of the kayak to keep it close to you while you take some deep breaths and prepare for the next steps.
This last point is especially important for sea kayaking because powerful winds or ocean currents can quickly take your kayak away from you.
So you should always get a hand on it as soon as possible after executing your wet exit and you should be careful to keep hold of your paddle during this process as well.
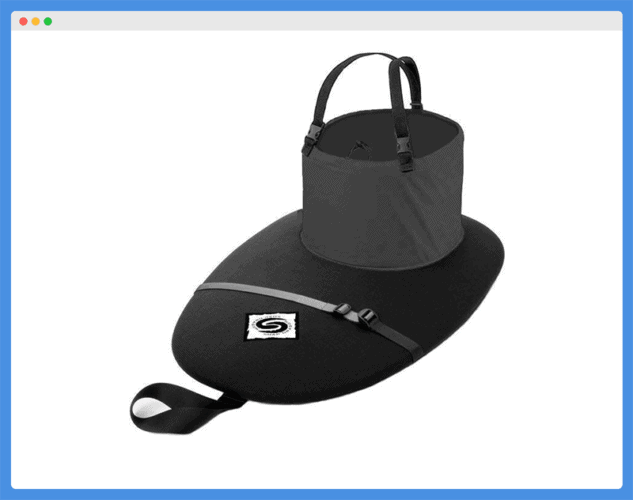
If you are paddling with a spray skirt, you’ll have to locate and pull the release strap on your skirt before leaning forward and pushing yourself out of your kayak. Spray skirts are all designed a little differently, but most of them have the release strap right at the front for easy access.
Example of Spray Skirt with Release Strap in Front
If you have trouble with your wet exit technique, whacking the side of your boat several times can serve as a useful distress signal if someone’s close enough to hear you.
But we highly recommend practicing wet exits in a pool or shallow body of water long before you really need it in a rescue situation.
After you’ve successfully performed your wet exit and taken a few breaths to compose yourself, it’s time to get to work again. Make sure you have your paddle in hand (if you don’t, locate it) because you’ll need it later.
Righting Your Kayak
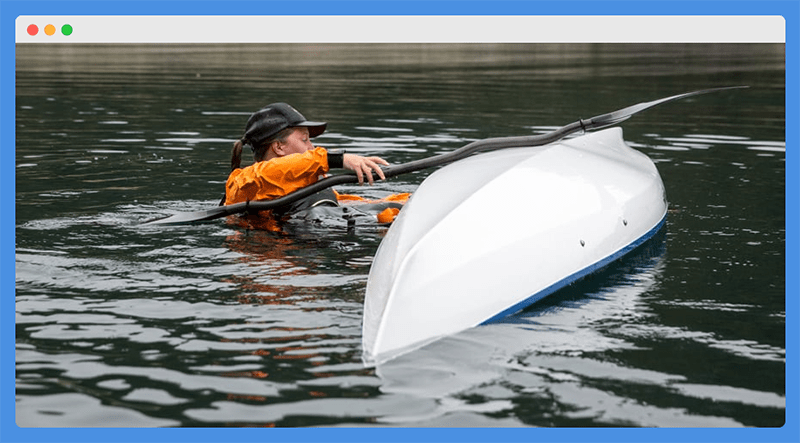
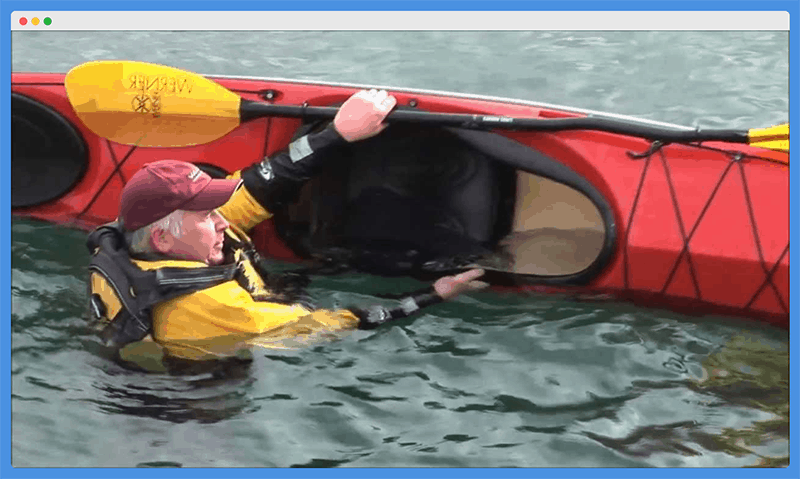
Now it’s time to get your kayak floating right-side-up again. To keep your paddle close by, slide it under your kayak and in the cockpit so that it remains in place until you’re ready to use it again.
Next, reach one hand under your kayak and grab the combing on the far edge of the cockpit. With your other hand, firmly grip the cockpit combing on the side of the kayak closest to you.
Now simultaneously pull the far edge toward you and push the close edge up and away. Your kayak should roll over relatively easily, even if some water does accumulate in the cockpit (this is what you have a bilge pump and sponge for!)
Now that you have your kayak upright again, reach one leg up and hook it into the cockpit of your kayak to keep it in place and free your hands up for the next step.
Setting Up Your Paddle Float
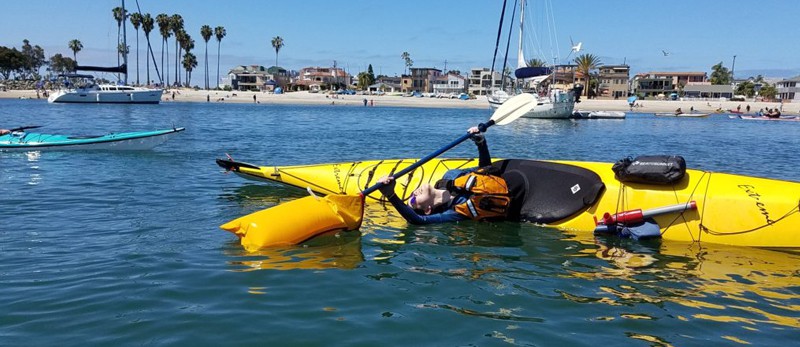
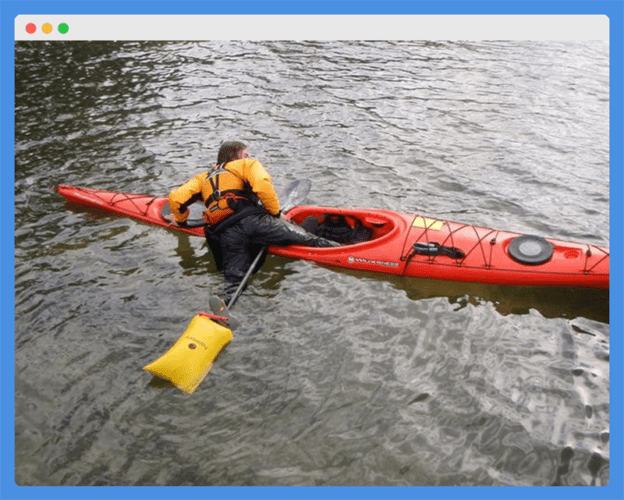
Start by reaching under your kayak and locating the paddle float that you smartly stored in an accessible location earlier. Attach it to one blade of your kayak paddle and inflate it fully.
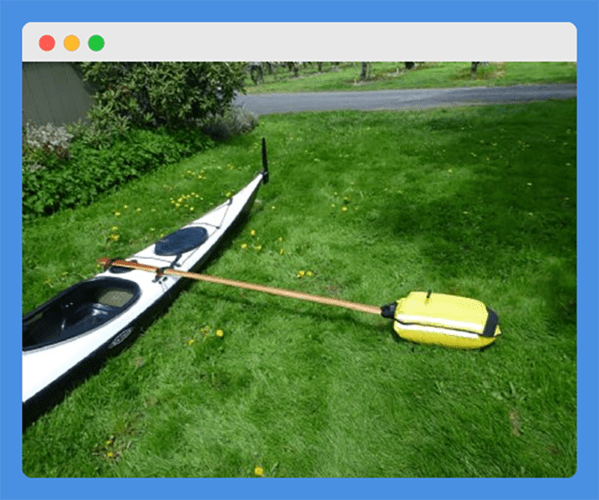
Now it’s time to create an outrigger to help you keep your boat stable before climbing back in. Orient your paddle’s shaft perpendicular to your kayak with the blade that doesn’t have the float on it positioned just behind the cockpit.
You can always slide the non-float blade under a deck line of your kayak to be sure it remains in place, but this is not required.
When it’s set up properly your kayak and kayak paddle should essentially create a T-shape if you were looking at them from an aerial view.
How To Re-Enter Your Kayak
There are actually two basic methods for re-entering a sea kayak once you have it upright. One involves a paddle float and the other does not, so since we already went over the steps of setting up a paddle float, we’ll start with the re-entry technique that uses one!
The Paddle Float Self-Rescue
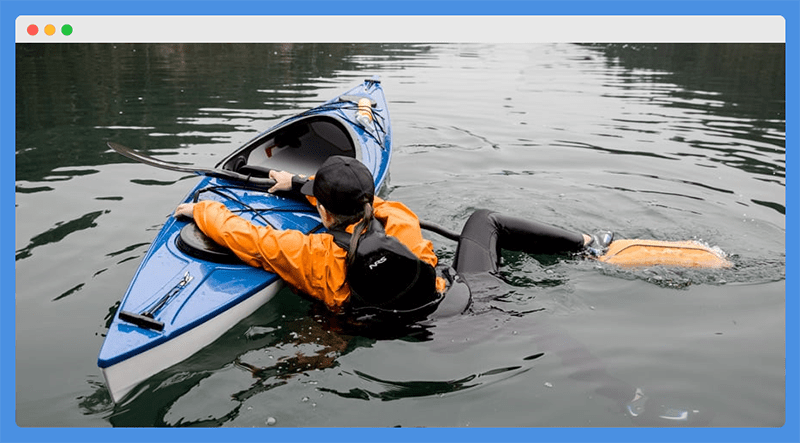
To set up for this self-rescue technique, position yourself on the side of your kayak at the stern. You should be behind the paddle float that you just set up in the previous step and your body should be facing towards the bow of your kayak.
With your right hand, firmly grab hold of both your kayak paddle shaft and the combing at the back of the cockpit. With your left hand, reach across and be prepared to stabilize yourself using the stern section of your kayak.
The key to this next step is not to forget your legs. This is the most common mistake that most beginners make and it’s really important to remember that your legs are going to do the majority of the work to get your body up and out of the water.
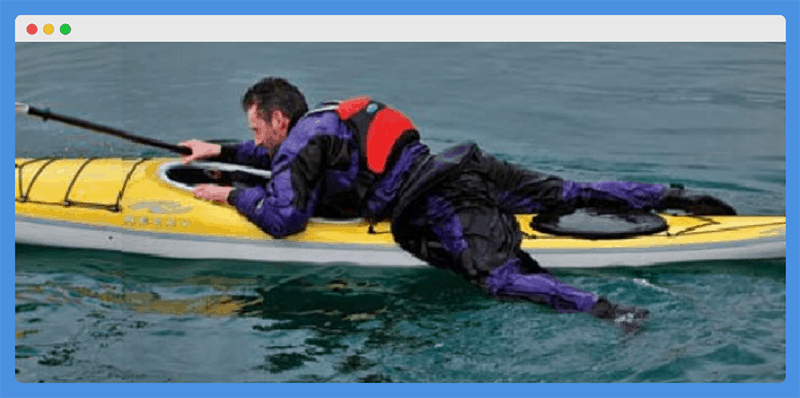
Next, kick both of your legs together (what’s referred to as a dolphin kick) and pull your chest onto the deck behind the cockpit. You should be able to rest for a second here if you’ve positioned your chest in the center of your kayak.
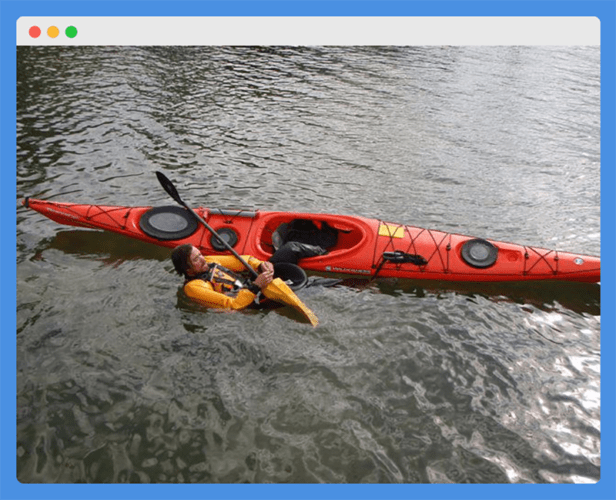
If you have trouble getting your chest up and out of the water to rest on the deck behind the cockpit, you can slip one knee over the paddle shaft for additional support.
With your inner thigh, press down to hold your body up and out of the water while you shimmy your chest onto the deck of your kayak behind the cockpit.
Example of Using Knee Over Paddle Shaft
Throughout this process of getting your chest onto the rear deck of your kayak, it’s really important to keep your upper body weight as low and close to your kayak as possible. Otherwise, you risk capsizing again and having to start the process all over.
But once your chest is on the rear deck comfortably, your next step is to pivot and slide your legs into the cockpit backward.
It’s really important during this step to keep your hand firmly on the paddle and cockpit combing in order to maintain stability.
Once you’re mostly in the cockpit, you’ll probably be wondering how the heck you’re going to paddle if you’re facing backward! The last step of this self-rescue technique is simply to turn yourself over and settle back into your natural paddling position.
But many new kayakers make the mistake of trying to lift their weight up again in order to turn over and re-position. We highly encourage you to stay as low as possible throughout this process in order to reduce the risk of capsizing once more.
The Scramble Self-Rescue
Another technique that you can use if you don’t have a paddle float is called the scramble self-rescue. As its name implies, it requires a bit of a scramble but it’s still a useful technique if you haven’t quite prepared with the proper rescue gear.
To execute this self-rescue technique, you’ll need to do everything necessary with the paddle float rescue technique up to getting your kayak upright in the water. Obviously, you’ll skip the Setting Up Your Paddle Float stage because you don’t have one!
But once your kayak is upright, you can move around to the side at the stern. Then you’ll need to simultaneous grab the combing at the back section of the cockpit and pull your body on top while keeping your chest down on the stern deck.
If your chest is too high while trying to make this pull, you’ll either slide right off the other side of your kayak or capsize your kayak again and have to start over.
But if you execute it correctly, your next step is to remain low and throw a leg over your kayak so that you’re straddling it.
From there, you can slowly work your way forward until you can drop your bottom into the cockpit.
Because you’ve been good about keeping your paddle nearby (or in the cockpit) while you’re executing this maneuver, you’ll now be able to use it to help stabilize your kayak as you get your legs inside the cockpit and readjust to a comfortable position.
Final Thoughts
Now that you’ve successfully righted and re-entered your kayak, it’s time to deflate and store your paddle float, pump any standing water out of your kayak, get your spray skirt back in place, and continue on your merry way!
And we think that’s just about everything you need to know about self-rescuing in a sea kayak!
But it’s really important to reiterate that all of these techniques and skills should be practiced to the point of mastery in a safe environment before you need them in an actual rescue situation.
And finally, if you always paddle with a partner that can assist you with getting back into your kayak, you should both be familiar with the various kayak rescue techniques that can be used if two kayaks are involved.

